
Use this checklist when you are setting up Hellotext for the first time or preparing a new business to go live.
The goal is to make sure your account, signals, channels, captures, and first playbook, route, or send are ready before customers start receiving messages.
If you are new to the product, start with What is Hellotext?.
If you are choosing between playbooks, campaigns, and Inbox workflows, read How Hellotext works.
1. Create and review your business
Create your business, choose the main country where it operates, and select the plan that fits your stage.
Before continuing, confirm the business name, its URL identifier, country, language, timezone, billing setup, and team access. Check the current plan and terms for the features and channels you will use; a business name does not confirm its subscription plan.
In Settings, check the Business ID to recognize which business you are preparing, especially if your account can access several. It is a public identifier, separate from your sign-in user and a private API token. Enterprise in the image is this fictional example business name.

Keep reading: Setting up your business.
2. Connect your commerce platform
Connect the platform where your customer, order, and product data lives. This helps Hellotext build customer profiles, read commerce signals, understand purchase activity, and attribute results.
Start with the integration that matches your store:
If you use WhatsApp commerce features, also review Connect your catalog to WhatsApp.
Before launching anything from this data, verify your data and signals after setup.
Check a known sample against its source system: the correct profile, order reference and source, items, quantities, amounts, currency, and date. Confirm which data and events your integration syncs and when it processes them. A saved product or order does not prove that a purchase was recorded, associated with the correct profile, or counted as an attributed sale.
This editor helps you recognize the data: Order ID displays reference ORDER-1001; Source displays custom_store, and Total amount is the monetary amount USD 89.90. Delivery: Deliver describes the fulfillment type, without confirming shipment or delivery. The example is an existing fictional order with no events; it does not prove a connected store or completed sync.

Validate purchase or cart signals only through authorized operations in an isolated test environment supported by the integration. Check their effects on charges, stock, notifications, and automations; an internal contact does not isolate a production purchase. Retain original references and dates to reconcile what was received.
3. Connect your messaging channels
Connect the channel you plan to use first. For most teams, this starts with WhatsApp or SMS.
If you are using WhatsApp, connect the WhatsApp account before creating WhatsApp captures or sending WhatsApp campaigns.
Keep reading: Connect WhatsApp.
For SMS, check available senders and destinations, your business limits, and the unsubscribe mechanism before planning a send. For WhatsApp, check the sender identity and the active approved version of the template that will actually be sent; saving a draft does not confirm approval.
Confirm permission for the planned channel, destination, and communication type, and honor opt-outs. A connected account, an available phone number, or a profile marked subscribed does not establish that permission on its own. Check the current WhatsApp policy for its conversation initiation and reply rules.
Also confirm how replies will be handled. Channels used for conversations are not necessarily available for campaigns; check the options offered by your business for the chosen send.
Keep reading: Messaging channels overview.
4. Add at least one capture tool
Before you launch campaigns, playbooks, or routes, make sure customers have a clear way to subscribe.
Start with the capture that matches where customers are most likely to join:
- QR codes for stores, packaging, printed material, or events.
- Shareable links for social media, ads, email, and landing pages.
- Forms for collecting customer details on your website.
- Checkout opt-in when customers are already buying.
Keep reading: Capture tools overview.
Review the information requested, the channel named in the notice, and what someone will receive after subscribing. In this example form, Phone number, Subscribe, and the SMS notice match one another; review configuration and permission before adapting the notice to promise another channel.
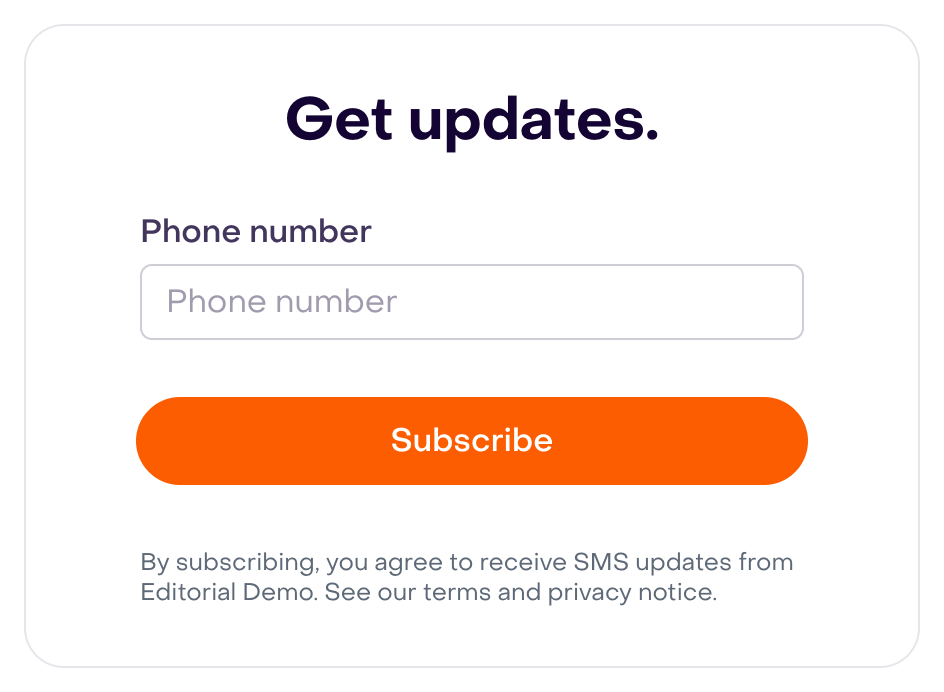
Before distributing a QR or link, or installing a form, review its destination and actual state, along with any associated coupon or journey. A draft preview does not prove it is installed or active. Collecting a detail, creating a profile, and verifying marketing permission are separate steps; check state and the intended communication before adding that person to a send.
5. Prepare your first audience
Create or review the audience you will contact first.
Use lists when you want to manage group membership explicitly. Use segments when you want Hellotext to update membership according to data or behavior rules. Check current membership before sending, including availability of the data each rule needs.
Check inclusions and exclusions in the chosen send: included groups are combined, a repeated profile counts once, and a selected exclusion removes it even if it also belongs to an included group. Profile counts or reachable recipient counts do not establish consent. Check permission by channel and destination, opt-outs, and exclusions; Unconfirmed does not confirm a subscription.
Keep reading:
6. Launch one focused playbook, route, or campaign
Choose one first outcome before expanding: recover abandoned carts, follow up after purchase, answer frequent questions with Instant Answers, guide returns or exchanges with Return & Exchange Helper, guide cancellation requests with Order Cancellation Assistant, collect subscribers, or send a one-time announcement.
Use a prebuilt playbook when the mission is already available. Use a route when you need a predictable step-by-step flow. Use a campaign when you need a one-time send to a selected audience.
Define the trigger, audience, channel, message, timing, and reply owner before enabling the flow or confirming the send. Playbooks and journeys can act on every profile meeting their conditions; a “test” label or internal name does not isolate their effects.
Before going broad, run an authorized check in an isolated environment or with controlled internal destinations and the required permission, as appropriate for the channel. Review the final message with actual variable values and fallbacks, links, tone, timing, unsubscribe mechanism, and handoff. Writing STOP in the body does not configure an unsubscribe mechanism by itself. Confirm receipt and reply handling; preparation or acceptance does not prove delivery.
Keep the first launch focused, with an owner and pause criteria. Review other flows, waits, and scheduled sends affecting the same audience; a pause does not recall messages already handed to a provider or guarantee cancellation of everything pending.
Keep reading:
- Playbooks and automation overview
- How Hellotext works
- First wins starter pack
- Implementation paths
- Go-live checklist before you send
- Choose your first playbook
- How to enable a playbook
- Getting started with journeys
- Creating a Campaign
- First launch best practices
7. Invite the people who will answer replies
Once customers can reply, make sure the right people have access to the inbox.
Invite teammates, review their roles, and confirm they accepted access to the correct business before launch. Agree on who will handle conversations, at what times, and what happens if the team is busy or has no coverage.
For playbooks that offer Escalation, review the switch and target team, such as Atención demo in this fictional Property Collector draft. That selection does not confirm an enabled playbook, an available member, or an actual conversation assignment.

Check receipt and conversation ownership through an authorized test of the intended channel, and identify who can pause or correct the flow if needed. If the channel cannot receive replies, provide another contact path and an owner to handle it.
Keep reading:
8. Check the first results
After your first launch, review what happened before changing too many things at once.
Look at audience growth, replies, clicks, playbook activity, campaign reporting, and attributed sales. Define a common review period and timezone; distinguish new profiles from confirmed permissions, prepared messages from delivered ones, and total clicks from unique clicks per message.
Compare each result against the population and period used by its report. A click does not prove a purchase, and a saved order does not prove attribution. Check references, original events, and attribution windows before comparing sales with your store; reports may update after data is received.
Record the initial goal, result, opt-outs or errors, and next change. Adjust one concrete cause at a time and retain a reference for the previous period. If there are incorrect recipients, duplicates, or an unsubscribe mechanism that fails, review scope and pausing before expanding.
Keep reading:
- Measure success in your first 7 days
- Playbooks and automation overview
- Choose your first playbook
- How to enable a playbook
- Campaign Reporting
- How we attribute sales
Optional before launch
Set up a custom domain for short links if you want branded links from the beginning. Confirm your plan supports it, the domain is verified, and destinations work before distributing links; entering a domain does not verify its DNS.
Review SMS sending limits for new businesses if your first sends will use SMS.