
Use this guide to decide what to connect first when you are setting up Hellotext.
Setup works best when you connect data sources before you launch captures, playbooks, routes, or campaigns. This lets you check the profiles, objects, and signals your integration provides before using them. Connection alone does not guarantee a complete historical import, every activity event, or sales attribution: those depend on supported data and events, customer identity, and attribution rules.
Recommended setup order
1. Confirm your access
Before you start, confirm the permissions each integration requires in the relevant store, marketplace, or Meta account, and in the Hellotext business. Access to a business does not necessarily allow you to change its integrations.
In Settings > General, check the name and Business ID before authorizing a connection. This header belongs to the fictional business named Enterprise, with public ID 4ONLdN32; the name does not indicate its plan. This ID identifies the business and can be used in Hellotext.js, but does not replace a private API token or administrator permissions.

For commerce integrations, keep the API keys, tokens, or plugin access requested by that platform’s guide ready. Do not share secrets in screenshots or place them in public storefront code. For WhatsApp, confirm that you can receive SMS or voice calls on the phone number you want to connect.
If the business owner needs to change, complete that account-access task before making broader setup changes. Keep reading: Transfer business ownership.
2. Connect your commerce platform
Connect the platform where your customers, products, carts, orders, and purchase activity live.
Choose the guide that matches your store:
After connecting, choose a known source record and check its data in Hellotext before building playbooks, routes, or campaigns from it. Check the profile, object, and actual event separately: a saved order does not confirm a recorded purchase or attributed sale. Initial scope and processing vary by platform.
To inspect an order, go to Settings > Objects > Orders and open Edit. Compare reference, source, amount, and currency against the source. This demonstration retains Order #1001, reference ORDER-1001, source custom_store, and amount USD 89.90, in draft with no events. The Order ID field displays the reference, distinct from the public API ID. Deliver is a delivery mode, not a shipment status.

Also check which products, variants, prices, images, URLs, and availability your connector supports and your first playbook needs. Seeing a product or price does not prove current stock or Meta publication. Resolve any required missing data in a supported source before launch.
Keep reading:
3. Connect the messaging channels you will use
Connect WhatsApp before creating WhatsApp captures, playbooks, routes, or campaigns. Check the intended number and business, recipient permission for the channel and message type, and the active approved template version when required. A draft or visible connection does not confirm approval or delivery.
If you sell through WhatsApp, connect the commerce platform first and then connect your product catalog to WhatsApp.
Connect Instagram when customers should be able to start direct-message conversations that reach your Inbox, playbooks, routes, or AI agents. Instagram uses its own direct login and is separate from Facebook Messenger.
Connect Messenger when customers should be able to message your Facebook Page and reach your Inbox, routes, or compatible playbooks. Messenger uses Facebook login and requires access to the intended Page and Meta Business account.
To send emails from your business domain, confirm that your plan enables the email channel, add a sender, and publish its DNS verification records. Check that the sender is active after verification; adding it or publishing DNS does not guarantee delivery or permission to contact each recipient.
Keep reading:
- Connect WhatsApp
- Connect your catalog to WhatsApp
- Connect Instagram DM
- Instagram DM fundamentals
- Connect Facebook Messenger
- Facebook Messenger fundamentals
- Set up email sending
For Push, separate collecting subscriptions from sending notifications. An active channel configured for the website origin allows subscription collection and management on any plan; sending requires Pro or Enterprise and is subject to platform availability and limits. If the channel is missing, confirm setup with Support: creating a custom channel in the interface may be plan restricted.
Shopify and VTEX provide installation through their integrations; complete installation on the published site and check that the app or pixel is current. Custom storefronts use Hellotext.js and a compatible worker on the same HTTPS origin. Browser readiness, visitor permission, and subscription acknowledgement are separate checks. Follow Set up Push notifications to choose an installation path; for custom storefronts use the current contracts in Set up Push with Hellotext.js.
4. Add capture and checkout tools
Once your data source and messaging channel are ready, add the capture tools customers will use. Define the requested data, permission channel and purpose, and installation location. A phone number or Subscribed profile does not demonstrate permission for every message or channel.
Start with the places where customers already interact with your brand: your site, checkout, packaging, store, ads, social profiles, or events.
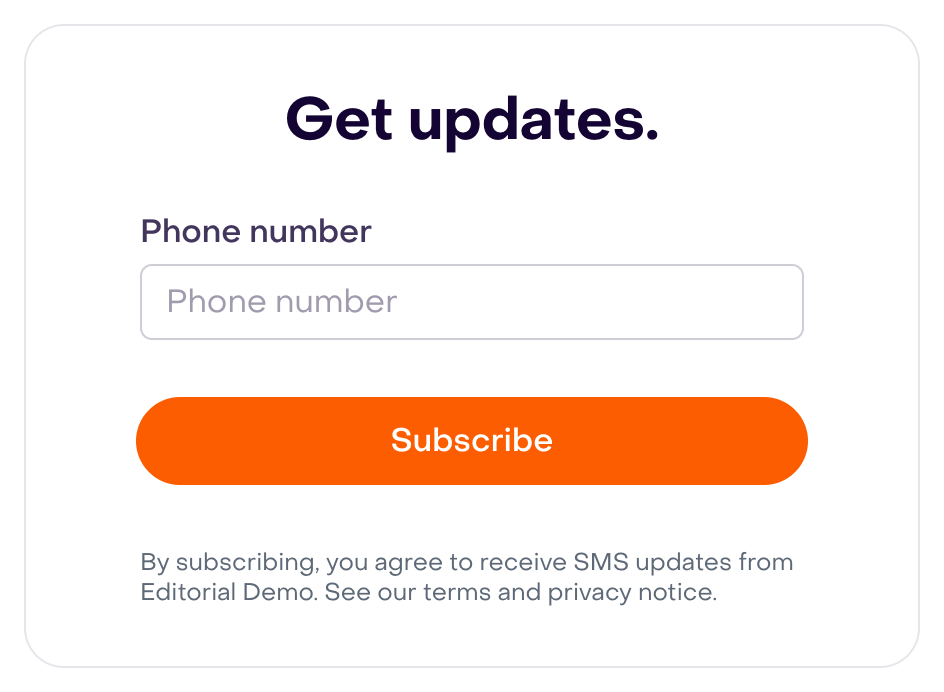
In Capture > Forms, review the preview before installation. This fictional form has a phone field and an SMS-specific notice, with a centered heading. It remains a draft with no submissions, coupon, or assigned route; it does not prove an active website installation or a subscription. Also verify installation, capture state, and behavior in the authorized environment.
Keep reading: Capture tools overview.
5. Verify the setup before launch
Before sending broadly, prepare authorized validation in an isolated environment with permitted test destinations. Define which actions could create events, purchases, charges, deliveries, or messages, and keep automations inactive until that scope is approved. If no safe environment exists, leave the dependent test pending.
- Use a coherent fictional profile and confirm it appears in Audience for the intended business; reachability and subscription do not replace channel permission.
- Compare a known record and supported events against the source: correctly associated customer or session, reference and IDs, source, date, amount, and currency where applicable. Distinguish test records from actual sales.
- On a custom storefront, await Hellotext.js initialization and explicitly record
page.viewedonce per actual view. Duplicate calls alter the data. - Check the actual activity on the correct profile after processing. A
receivedresponse does not guarantee the event was recorded or its effects occurred. - First review the template, personalization, final URL, opt-out, and reply handling. Test delivery only when authorized, with permission and isolated destinations; a draft or accepted request does not prove receipt.
- Check capture behavior and, for Push, browser permission and subscription separately. Confirm response ownership and capacity before enabling playbooks, routes, or campaigns.
For a fuller checklist, use Verify your data and signals after setup.
Troubleshooting checklist
If an integration does not behave as expected, review the basics first:
- The connected account is the correct store, site, marketplace, or Meta Business account.
- The Hellotext business is the right one.
- API keys, tokens, plugin configuration, or app permissions are still valid.
- Storefront domains and checkout scripts match the active store.
- Browser popups and authorization redirects are allowed during channel setup.
- The integration completed installation and is processing supported data. Compare a known record and timestamp rather than waiting for a universal delay. If a write has an uncertain response, inspect the record before retrying. Do not remove and reconnect a working integration without investigating the cause.
If setup still does not look right, contact Support with the business name and public ID, integration, domain, step, date and time zone, record reference, and exact warning. Explain expected and observed behavior; redact private tokens, passwords, and customer data from logs or screenshots.